
When replacing it isn’t an option, here’s how to refinish a simple rifle stock.
Restoring firearms has been a hobby of mine since I became interested in guns nearly four decades ago. The Gun Digest Books of Exploded Firearms Drawings were invaluable as I started this journey. Having a few gunsmith courses under my belt and the knowledge contained in these books allowed me to pick up many firearms on the cheap—even if they were missing parts, incomplete or straight-up broken.

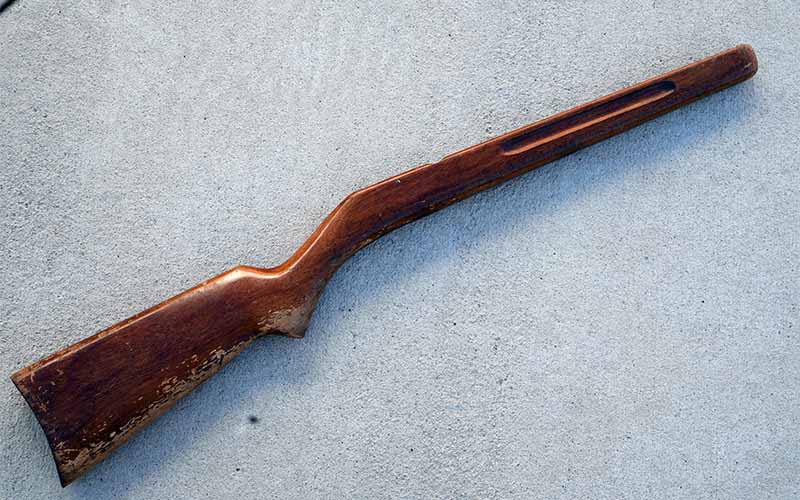
The Stevens Model 66 was a relatively inexpensive bolt-action .22 rifle, and like most firearms made by Stevens, this was viewed like a hammer or a screwdriver: a simple and relatively inexpensive tool. It was produced from 1929 to as late as 1945. It’s tube fed and can chamber .22 Short, .22 Long and .22 Long Rifle ammunition, and the stock is built of walnut and equipped with a large takedown screw. This particular model was improved with an aftermarket, receiver-mounted peep sight, and it was purchased in 2019 for $50 at my local Cabela’s in Reno, Nevada.
That’s right: $50.
It was so cheap because it was missing the factory rear sight, and the stock looked like it was left out in the rain for 75 years. It had no warmth or luster that’s so often seen on walnut stocks from days gone by, and the finish was flaking badly on the wood, particularly on the lower half of the stock.
Still, the metal was relatively clean with no pitting or rust, and the rifle proved reasonably accurate with the peep sight. This wasn’t a personal family heirloom, and thoughts of a nice Boyds laminate stock came to mind as a replacement.
Unfortunately, Boyds doesn’t make a stock for this model. Neither do any other stock manufacturers, for that matter, because rifles such as these were low priced to begin with and, again, viewed as simple tools. You could almost read into this as “disposable,” but the truth is that most firearms are built to outlast many lifetimes.
At this point, I was left with two options: Keep shooting it as-is with the hope of finding a replacement stock in nice condition, or roll up the shirt sleeves and refinish the walnut myself.
I chose the latter.
Refinishing Candidates
Before refinishing a stock, make a clear examination of conscience. It’s true: Refinishing many stocks will decrease the value of the firearm. This holds true for antique Winchester lever-action rifles, handmade double guns … and just about anything with a two-piece stock, and anything with deluxe checkering or carving in the wood.
For most of those firearms, you might need the services of a professional. Unless you’re a master woodworker, please steer clear of such projects.
But, the Stevens was perfect for this job. It was low in price, had a simple one-piece stock with no checkering and its profile could best be described as “smooth and rounded.” Mild sanding wouldn’t be very noticeable, and the stock grain was very simple to begin with. Again, if you’re going to start a refinishing project, keep all these factors in mind before you destroy something potentially valuable.

For a stock such as this, you’ll need some sandpaper of various grits (120 to 400), a coat hanger, wood stripper, lemon oil, degreaser, steel wool and the Birchwood Casey trifecta of Tru-Oil, Walnut Stain and Stock Sheen & Conditioner.
Step 1: Disassembly
As always, ensure the firearm is unloaded before you start working on it. There, I said it. I had to say it.
Have a well-lit, well-ventilated area for your project, and if you’re not familiar with the firearm in question, find a resource such as one of the Gun Digest mentioned earlier, or at the very least, search up a quality YouTube video to help you out.
The Stevens was extremely simple to take apart due to the takedown screw. Separate the barreled action from the stock by removing the screw, and set the action and this screw aside. The rest of the stock’s furniture (butt plate and trigger guard) are removed via four slotted screws. Take these off and set them aside as well. If you’re attempting a project similar to this and find the screws to be of different sizes; make sure you remember which screw goes to which hole by putting them in plastic bags and marking them with a magic marker.
Step 2: Strip The Old Finish
Depending upon the original finish, you’ll most likely have to resort to a chemical stripper to remove it all so you can start with a blank slate. If a lot of varnish or wax was used, you might need to go with mineral spirits. In this case, however, I went with CitriStrip. This is a biodegradable wood stripper that’s safe for indoor use.
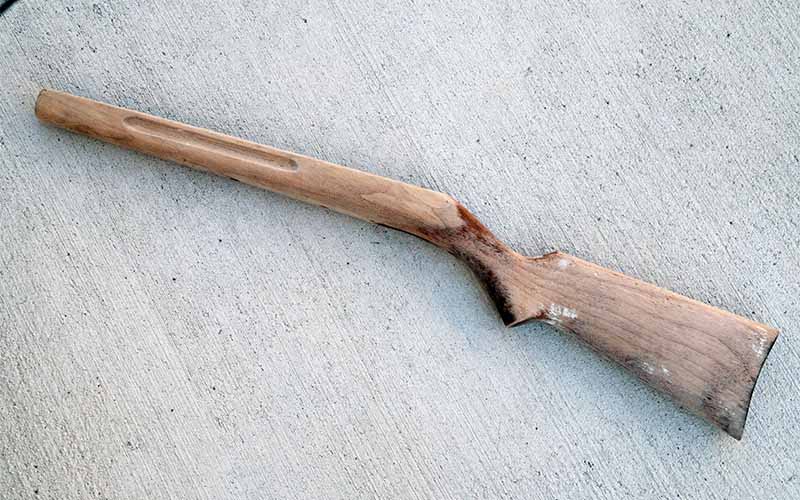
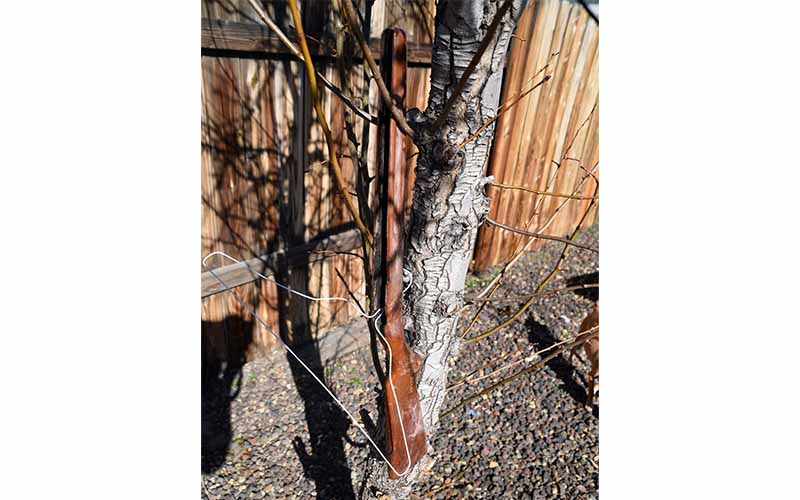
You want to pour it on the stock and work it into the wood. This one makes a nice lather, and once the entire stock was covered, a metal coat hanger was used to hang it on a tree in the backyard for 24 hours.
The next day, it was immediately evident that most of the old finish was gone. The stock was then placed in the utility room sink and rinsed in hot water with Dawn dish soap. Over 70 years of dirt, crud and the original finish were removed in less than one day. Steel wool got the last bits of finish out of small spots, but there was still some grease and scale left, so it had to be degreased.
Step 3: Degrease The Stock
Boil water, and use your utility sink—or maybe a bathtub or cattle trough—whatever will keep you out of trouble with your significant other. Place the stock in the sink or tub for a soak, then lather it in degreaser. Let it sit for 15 minutes and rinse with boiling water. Allow it to float for 5 minutes, and then flip it over for 5 minutes on the other side. Do this about five or six more times until the water is just warm.
This process will swell up the wood fibers in the stock and fill out small dings in the wood that the stock may have picked up over the years. It might also show hairline cracks in the wood, so examine it carefully before you continue and repair as needed.
At this point, take the stock out of the water and hang it up to dry again. Once it’s completely dry, I hit the stock with a light coat of lemon oil to put some natural oil back into the wood.
This is when you’ll want to sand the stock. I recommend doing it by hand; electric sanders might leave marks in the woodgrain that become visible when you stain it. Start with 120-grit and work your way up to about 400-grit, always working with the natural grain of the wood.
Finally, go over it with fine steel wool.
Step 4: Staining The Stock
The stock is fully prepped at this point, and you can stain it the color of your choice. There are some true artisans in woodworking out there who can do unbelievable patterns in the finish … and maybe you have that kind of talent. As for me, I like to keep things simple and efficient. I went with Birchwood Casey Walnut Stain. This is a water-based stain that can be found at your local gun shop or sporting goods store, and it provides a rich walnut color on your stock.
It’s a concentrate solution, so you might want to place a drop on the stock to see how it looks, and the stain can be diluted with water for a lighter color if it appears too dark for your taste. Apply it with a clean, lint-free cloth or brush, and once again, allow the stock to dry at least 12 hours.
Going back to Birchwood Casey, you’ll want to use Try-Oil Stock Finish at this point. This stuff seems to dissolve or clump up and become useless when exposed to air, so poke a small hole in the foil seal under the bottle cap so it comes out in drops.
I do this step by pouring it on the stock and allowing the wood to absorb it into the grain. When it looks finished, wipe it down and hang to dry yet again for another 24 hours. If you’re seeing open pores in the wood, repeat this step again, including drying for another day.
If you see any imperfections in the wood, sand them down with the 400-grit sandpaper and the steel wool once more. Wipe the stock down with tack cloth and you’re almost ready for the final finish.
The Waiting Is The Hardest Part
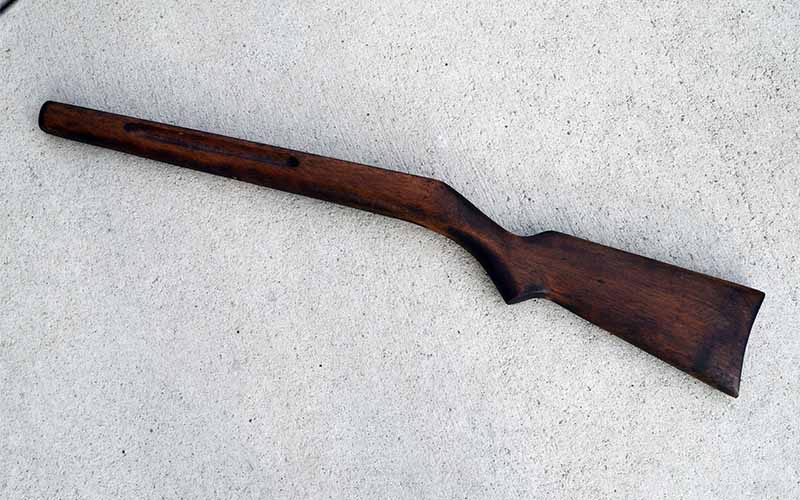
Wait about seven days and polish the stock with Birchwood Casey Stock Sheen and Conditioner. A double coat will give you more of a classic matte finish. If you want to take it further and go with some added protection against time and the elements, you can coat the stock with Birchwood Casey Gun Stock Wax. I didn’t go to this point, as I wanted a simple working finish, but I brought this rifle back to a respectable working gun finish, and it’s ready to be passed on to the next generation of shooters in the not too distant future.

If you wish to bed the action, this would be a good opportunity, but that’s another DIY project completely … although it’s much less difficult than you might think, and it can dramatically improve a rifle’s accuracy. The rifle went back together easily and shot as well as I expected.
In our 21st-century view of the world, the answer all too often is to dispose of something that’s cheap or perceived as replaceable. If you find yourself with a working, wood-stocked rifle that has seen better days, know that you can bring it back to life and restore that sentimental value. It’s a rewarding payoff for a few days of stripping, sanding and staining. Outside of the time factor, the investment is less than $50 in materials.
This Stevens Model 66 may not have had any sentimental value for me, but I sure hope that, someday, it will for one of my grandkids.
Editor’s Note: This article originally appeared in the December 2022 issue of Gun Digest the Magazine.
More On Rifle Stocks:

NEXT STEP: Download Your Free Storm Tactical Printable Target Pack
62 Printable MOA Targets with DOT Drills – Rifle Range in YARDS This impressive target pack from our friends at Storm Tactical contains 62 printable targets for rifle and handgun range use. Target grids and bullseye sizes are in MOA. Ideal for long-range shooting!
Subscribe to the Gun Digest email newsletter and we’ll send your print-at-home target pack right away. Just enter your email address below.